This is a short series of quick tips on drum processing in Cubase.
As with the kick drum, choosing appropriate samples is a really important part of getting the right sound – the starting point for all your hard work is right here, so make it count. As before I am using samples from the vengeance packs, as they seem to provide everything I am looking for in a sound like this.
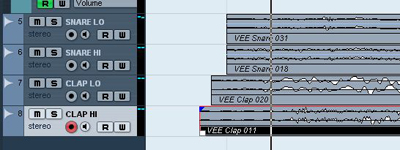
For a really fat snare/clap sound I will be using four samples – two snares and two claps. Layering these together really helps to build up a full, rounded sound that should cut through your mix with plenty of energy and punch. As with the kick drum I am using one sample to provide the low end and one for the high end.
I’ve taken exactly the same approach when it comes to choosing samples to make up the clap part of my snare/clap sound.
Now we have our samples loaded in, I’ve laid them out on a track so they sit on every beat like this
It’s worth noting once more at this point that the samples you choose really do make a huge difference to the sound – the samples in this example are definitely leading to an electro/house type sound – I have lowered the volume of the last clap in the mix as it was a little too loud – you may wish to adjust the balance of your drums if they sound a bit unbalanced.
Positioning Your Samples
To add a bit of life to the sound you can try moving the samples off the beat slightly, staggering them to give a fuller sound. You can do this by turning off the snapping in Cubase and manually moving the samples off the beat like this:
I find this can be a little irritating when it comes to editing your beat, so I prefer to delay the entire tracks using the offset control in the track settings. It’s the control below volume and panning with the clock symbol:
This way you can stagger the samples but they can stay perfectly snapped to the beat on the track. I usually find that adding something between 2 and 50 units here does the trick, splaying out your tracks. In this case I have opted to delay both snares by 2.55 so they still hit together but are slightly offset from the kick drums.
Note: For a more solid, breakbeat type snare/clap sound I would be tempted to offset things much less – play around and see how you like it!
Adding Stereo Image
Whilst some drum samples come with some stereo information many don’t, and adding a bit of stereo delay can help to add some subtle interest to your track. To do this I am going to add a slight delay to the right channel of each of my clap sounds using the stereo delay. Leave the left channel untouched with the mix on 0%, then delay the right channel by about 20 ms, making sure to put the mix on 100% and to turn off the delay filters – your unit should look like this:
I usually apply exactly the same effect to the other clap sound, but leave the snares untouched.
Dynamics Treatment
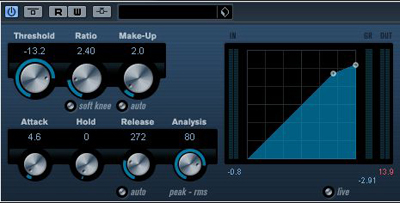
I usually like to leave the snare/clap track relatively uncompressed, but a little is always a good idea to help the samples gel together and add a little extra punch. You can use the same trick as before to find your attack setting.
Here are the settings I ended up with. Compression like this will also help to control and low frequencies that might be lurking in there…
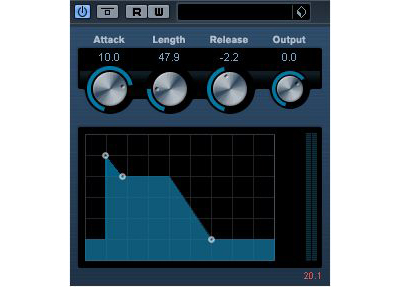
I’ve also added an envelope shaper with similar settings to the kick drum to add some punch, though I’ve extended the attack to cover that wider attack period created by the splaying of our drum hits:
EQing Your Snare/Clap
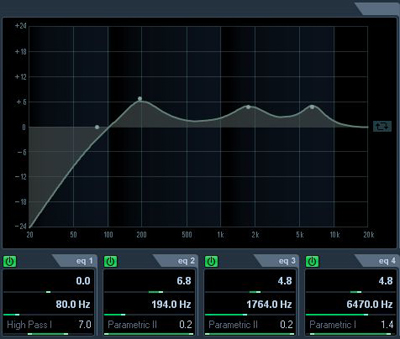
The final step here is to add a bit of EQ to fill out the sound and add some presence. Using the standard Cubase channel EQ I’ve rolled off the sub at 80Hz using a high pass filter, and added some bottom end weight at 194 Hz. Finally, a couple of presence boosts at around 2 kHz and 6kHz add some top end presence and definition.
Keep a lookout for the next part in this series where we will be looking at hi hats/percussion.
Original Source Here

